and.. How do I copy XO files to my own computer? It took me a few days to learn how to do screenshots to post here. It’s really simple and this lesson will also teach you how to copy almost anything from the journal to a USB drive connected to your XO laptop.
Step 1: Get the screen you want and just hold down the Alt key and press 1. (Alt+1) This will create a screenshot.
Step 2: Go to back to Home and resume the XO Journal Activity. You’ll see a new “Screenshot”
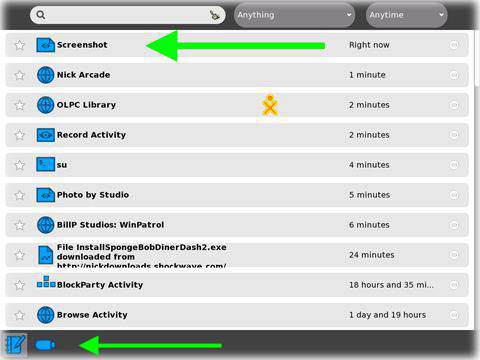
XO Journal
Step 3: Plug in a USB thumb drive or other supported USB drive into one of the USB ports. You could actually do this at anytime but I wanted to split up the two operations. When your USB drive is plugged in you’ll see a USB icon on the bottom of the screen.
Step 4: Click on the Screenshot; drag it down and drop it on the USB icon. You can also drag down other data objects like photos or files created with Write.
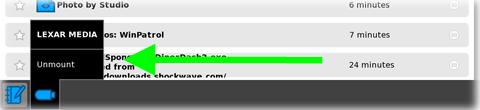
Step 5: Hold the pointer over the USB device icon and wait until you see “Unmount” appear. Be sure to Unmount the device or the the screenshot file may be corrupted.
Step 6: Plug the USB drive into your other computer and use explorer to view your files. You should see “Screenshot.png” followed by “Sceenshot_1.png”,“Sceenshot_1_2.png” and so on. Most photo and imaging programs will read the .png format.


6 comments:
What a sweet HowTo! I've wanted to know how to do this for a while.
Thanks!
Thanks Wayan, that's a real honor coming from you.
Bill
How about accessing the files within the USB disk...?
I find useful to change the name of "screeshot" or other activities (either on the Activity tab or in the Journal) to find them or move them more easily. And the Journal is searchable.
Similar idea, I wanted to move a XO word processor file from the XO to my laptop via an SD card. First, the SD card mounted just as ... the usb. Shows when you're in the journal.
To Paste from the XO Abi word form I had to:
1. Open the Doc in XO Word (XO AbiWord)
2. Select the whole deal
(was this necessary? )
3. Copy it.
4. Add the clipboard document to the Journal. Adding it is an option when you hover over it. It appears to the left, when you are at "home" .
5. From the journal, drag the clipboard journal entry to the SD icon.
6. Unmount the SD card.
WITHOUT PASTING TO THE CLIPBOARD, A NUMBER OF THINGS THAT SEEMS LIKE THEY SHOULD WORK, DID'NT ..
The Doc I saved was in rich text format, which is not the same as MS Word rtf, but I down loaded the free AbiWord word processor for my laptop and it loaded up there with all the features I selected back on the XO. Font, color, layout, bullet list, and printed fine. All of this part was easy. Yes, there is Abiword for Windows.
I also moved an HTML version of the document to the SD card and was able to go directly to Microsoft word with characteristics pretty well maintained. Here I did the move with unix cp commands...
A follow up to my last post. When the XO file is read into windows AbiWord, Font size, Color, formatting (Titles, Bullet lists etc ) come through fine, but font changes don't . I believe this is because there is almost no overlap between the two sets of Fonts with the XO fonts being on the unusual side. I imagine there is a fix ... adding fonts to windows or the XO .
Post a Comment